The “business categories” you choose for your Google Places page matter—big-time. Your choices can help get your business visible to all the local customers you’re trying to reach, or they can cause Google to pluck your business off the map (and not put you back until you fix your categories).
Fortunately, it can be easy to pick the optimal categories when you’re first creating your listing, and it’s also easy to change your categories later if you didn’t get them quite right at first. All you have to do is login to your Places page and change them—and you don’t even have to get a PIN and re-verify your ownership of your Places page.
Whatever stage your Google Places page is in, you can get visible to the maximum number of local customers by picking your categories according to 13 best-practices:
1. Follow the Google Places Quality Guidelines. They’re straightforward and concise regarding categories. Sure, there’s plenty of room to mess up even if you follow them, but if you don’t follow them, Google will almost surely ding your visibility in Places. (Make sure to pay extra-close attention to the rule about how your categories should describe what your business is, rather than describe the services you offer.)
2. Pick as many relevant categories as you can—preferably 5, which is the maximum number you can choose. Emphasis on “relevant.” If you’re an appliance-repair service, don’t choose “Appliance Store” if you don’t sell appliances.
3. Use Mike Blumenthal’s Google Places Category Tool to find the proper category names that describe your business and to make sure you’re not forgetting any categories that actually apply to you.
4. Use the Google Keyword Tool when you’re having a hard time deciding exactly which category to pick (out of several good options). Enter the category names verbatim into the Keyword Tool, and see which one has the most local searches. In a toss-up, I’d generally suggest you pick the one that’s more searched-for.
5. Look at which categories your higher-ranked competitors have picked, and the order in which the categories appear. Do this simply by going to their Places page and looking at their categories. See if you notice any patterns. If, for example, the 2 highest-ranked businesses use the same categories, consider those categories for your Places page. (By the way, LocalSearchToolKit is a really handy tool that can help you with this step and others.)
6. Make sure the first 3 categories you pick are the most dead-on relevant and representative of your specialties, because it is only the first 3 categories that potential customers will see on your Places page unless they click to see the others. You don’t want people leaving your page because they didn’t realize that you actually do offer the specific service they’re looking for.


7. Routinely check your Google Analytics data and your Google Places Dashboard statistics to see if you’ve been getting visitors for the keywords you selected as categories. Let’s say you’ve selected “Bagpipes Repair Shop” as a custom category. If Google Analytics and your Places dashboard are telling you that nobody has visited your site or Places page after having typed that search term or a similar one into Google, it’s probably worth selecting a different category and seeing if it brings visitors.
For picking custom categories:
8. Always remember that Google scrutinizes your custom categories against the other categories you’ve chosen and the keywords in your Google Places “description.” If the keywords in your custom categories are identical or very similar to those in your other categories or your description, Google may bump down your rankings or (worse) suspend your listing.
9. Don’t choose plural or singular versions of categories you’ve already picked from Google’s list. For one thing, the plural and singular versions of a given search term usually return the exact same local search results. However, even if you’re ranked #1 in Google Places for the term “dentist” but not for “dentists,” adding “Dentists” as a custom category is unlikely to make you visible for that term.
10. Recognize that including multiple “keywords” in one category field is a gray area, in terms of what Google accepts and what it doesn’t. On the one hand, Google states that “Only one category is permitted per entry field.” So you generally shouldn’t write really long category names or string two significantly different categories together with “and” or an ampersand. But sometimes it makes sense to do so, and Google likely won’t penalize you if you don’t overdo it. For instance, a custom category of “Roofing Maintenance & Roofing Repair” might get your listing pulled, but the less keyword-spammy “Roof Repair & Maintenance” will probably be OK. (In fact, the latter is probably better than having “Roof Repair” and “Roof Maintenance” as two separate custom categories, which also might get you in hot water with Google.)
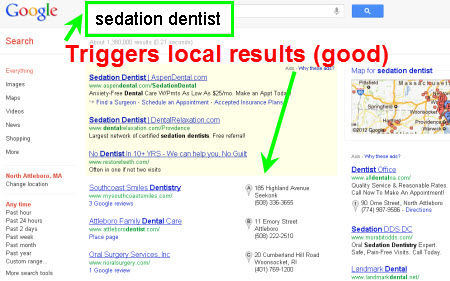
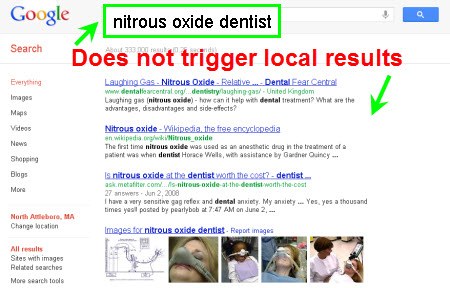
11. Double-check that your custom categories actually return Google Places local results when you type those words into Google. The whole reason you’re going the extra mile to choose the best categories is so that you can get visible to customers who are searching locally for what you offer.


12. Make sure you’ve spelled the categories correctly, for Pete’s sake. Don’t use any abbreviations, either (unless the abbreviation is how customers typically search for that particular term).
13. Don’t be afraid to get a second opinion (or a third or fourth opinion). Maybe ask an employee or your spouse to skim through this post and then come up with 3-5 categories that might apply to your business. Then compare notes and see which categories you both came up with.
—
Any tips you’d suggest for getting the maximum local visibility from your categories? Any questions or suggestions for me? Be cool and leave a comment!
